-Turn left and pick up the morse code chart that is sitting on the floor.
-Turn around 180 so that you are facing the window with the blinking light.
-Examine the white poster on the wall.
-In the middle of the poster you'll notice small red text. Click it to examine closer
-The text reads "Letters = Pies. Start at the first pie in 'high.' Then count every ten pies to see a message for keen eyes."
-This clue refers to the main message on the poster. If letters are pies, then the "first pie in high" is H.
-From H, count every ten letters until you get to the end. You should end up with "HELPISONTHEWAY."
-Back away from the poster, then click on the telegraph machine sitting on the table.
-Using your morse code chart, enter the message "HELPISONTHEWAY" one letter at a time.
-Every letter is composed of dits and dahs (dots and dashes). Press the lever quickly for a dit, hold for a dah.
-When the correct message is entered a compartment will pop open on the screen and reveal a small key. collect it.
-Before leaving the telegraph make sure you pick up the 'repeater' that is sitting on the table.
-Back away from the telegraph and turn right so that you are facing the lighthouse board on the wall.
-Pick up the battery on the floor
-Examine the lighthouse board. Use your small key on the panel on the front of the lighthouse. The panel will open, revealing another key.
-The gold key opens the main door of the shack. Back away from the board and make a 180 to find it.
-Unlock the main door and go outside onto the porch.
-Examine the small lockbox on the railing. Type the code '5752' and press enter to open the box. Collect the bulbs and the repeater inside.
-'5752' was found inside the shack: when facing the window with the blinking light, click the red bar on top to pull down a shade. The shade has a backwards 7 cut out of it. When you turn around to face the wall behind you, you'll see that 7 is the missing digit in the code written on the wall.
-Go back inside the shack and face the lighthouse board again. Examine the fuse box that is over on the left wall.
-Collect the wires hanging on the right side of the box.
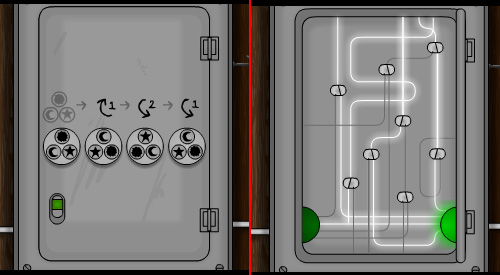
-To open the box you need to set the dials to the right positions. The first position is given to you. The diagram above the dials indicates which direction and how many times you would need to turn the previous dial to get to the new position.
-When you have the correct sequence the top symbol on each dial, in order from left to right, should be Sun, Moon, Star, Moon. Refer to the picture below.
-With the correct sequence the tab on the door will turn green. Open it to see the system that powers the telegraph machine and lighthouse board.
-The light on the left is lit, which means power is flowing to the telegraph machine. If the light on the right is on then power is flowing to the lighthouse board. Only one can be powered at a time.
-We're done with the telegraph so don't worry about turning it off. To send power to the lighthouse board flip the switches so that they look like the picture below:
-When the right light is on back away from the fuse box and go examine the lighthouse board.
-Place the small bulb in the yellow light slot at the top of the lighthouse to turn on the light.
-Collect the three repeaters sitting at the bottom of the board. You should have five total.
-The object of the lighthouse board puzzle is to send a beam of light from the lighthouse to the ship behind the rocks.
-Once the lighthouse is sending a beam of light, place your repeaters into the board holes so that it looks like the picture below:
-Notice that a wire leads from the ship across the wall to the panel on the floor.
-When the ship is receiving light a beam will shoot out of the top of it. This means that the wire connected to the ship is powered and that the floor panel is open.
-Back away from the board puzzle, turn right, and enter the panel on the floor. You are now under the shack.
-It's dark down here so we need to produce light. Combine the wires, large bulb, and battery. You can combine the wires with the bulb OR battery, and then combine that with whatever part is left.
-Click on the darkness with your makeshift flashlight to light it up and see the boat.
-Click the boat to escape!
NOTES:
- The large bulb was intended to be a red herring, but at the last minute I decided to add the wires and battery so they could combine for the flashlight. Originally the bottom area wasn't dark at all.
- You can enter numbers into the morse code machine too, I just didn't include their symbols on the chart because I didn't want people to enter the lockbox code there.
- The face of Shaquille O'Neal is hidden in the game somewhere. Yep.